


")


Setup your Raspberry Pi in few steps
Raspberry Pi:
The Raspberry Pi 2 Model B is the second generation of Raspberry Pi. It replaced the original Raspberry Pi 1 Model B+.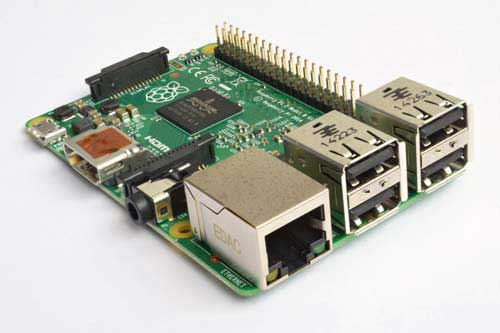
The specifications of the Raspberry Pi 2 Model B are:
● A 900MHz quad-core ARM cortex-A7 CPU
●1 GB RAM
●4 USB ports
●40 GPIO pin
●Full HDMI port
●Ethernet port
●Combined 3.5mm audio jack and composite video
●Camera interface(CSI)
●Display interface(DSI)
●Micro SD card slot
●VideoCore IV 3D graphics core
The form factor of the raspberry Pi 2 is identical to the previous Pi 1 model B+
How to setup your Raspberry Pi 2 B in few steps:
Prerequisites:
Before you setup your raspberry Pi 2 B you will need:
1. mouse(optional)
2. keyboard
3. micro SD card
4. A Wi-Fi dongle
5. power supply
Downloading Raspbian and writing the image to the SD card:
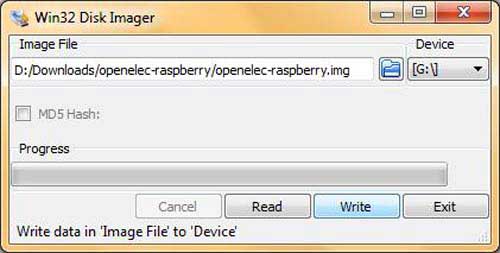
1.Download the latest version of Raspbian
2.You will need an image writer to write the image of Raspbian onto the SD card. So, you’ll need to download win32 disk imager
3.Insert the SD card into your laptop/computer and run Win32 Disk Imager. Once you’ve opened it, browse and select the downloaded Raspbian image file. Select the SD card and click Write.
4.Once it’s done writing, eject the SD card and insert it into your Raspberry Pi, and turn it on.
Setting up the Pi:
1.When the raspberry Pi boots up for the first time you should be greeted with a screen called Setup Options. 
If you miss the setup screen you can always get it by typing the
following command in the terminal: sudo raspi-config
On this
screen you should Expand Filesystem(This
ensures that the entire SD will be used)
2. Updating the firmware: Once
you are on the desktop, open up the terminal and enter the follow command to
update the firmware.
sudo rpi-update
Now your raspberry pi
is ready for use
1 Comment(s)
hello sir how to make home security system on rpi3
Leave a Comment